Monday, May 28, 2012

A True Wash Room

During the major house renovations, we redid the upstairs bathroom and added a second. But we neglected the downstairs bath. Until now.

The previous house owners were elderly and had troubles making it up stairs. So they were using an addition off the back of the house as a bedroom and created a handicap bathroom. The bathroom included a huge toilet (I'm pretty sure this thing could have competed in cavernous-ness with the grand canyon), a really old vanity, an equally old medicine cabinet, and a handicap shower.
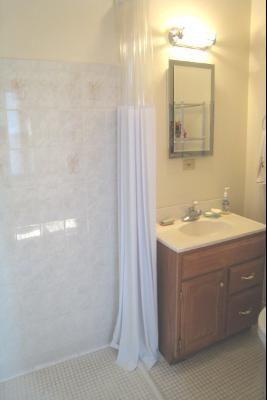

Seeing as we have 2 full baths on the 2nd floor and no bedrooms on the first, we had no need for a shower on the first floor. I've also been complaining about having to take clothes from the 2nd floor down to the basement to do laundry (I got spoiled with having laundry in my apartments). Thus the idea was born to turn the handicap bathroom into a half bath/laundry room.

We decided to leave the layout pretty much the same as it was and just exchange the shower for a washer/dryer to save money (less pipes to move). The old giant toilet and vanity made it awfully tight, so we opted for a smaller toilet (standard size) and a narrower vanity. We went with a 'euro vanity' which allowed for a full depth sink, but a narrower cabinet. This made the room appear bigger without making the vanity/sink seem undersized. To keep the house cohesive, we used the same tile as both upstairs bathrooms for the floor (plus we just love the tile).

While opening up the walls for a bit of plumbing and to change out the door (we were going to use an old door in the basement to replace the plain front door to match the rest of the house), we ran into a bit of a snafu. The load bearing wall lacked a proper header. Since everything had to get ripped out to fix, we decided to increase the opening a bit more and install double doors for better access to both sides of the room.

My favorite part of the room: the washer/dryer. We got an all in one machine. This allows us to put in a load, set the wash cycle, set the dry cycle, and forget about it for a while. It also has a delay start feature of up to 19 hours and a cool down cycle of up to 4 hours after finishing drying. I've actually put in a load of laundry at night, set the wash to start in the afternoon of the next day, and come home to washed and dried clothes. And it even sings to you when it's done.


With a towel hook, toilet paper holder, and some shelves for laundry detergent and storage, the washroom was done.  It looks so much better than before (at least in our opinions). And it's great to not have to go down to the basement for laundry anymore. Take a look!


Monday, April 23, 2012

Making A Comeback!

Yup, I'm still here. Life has been a little hectic lately and unfortunately the blog got a bit neglected. Ok a lot neglected since its been almost 3 months since the last post. But I'm back and have a lot to tell you all about. Here's a quick preview of some of the things we've been working on lately.

A finished bathroom/laundry room!


Our own personal workout area!


Living room "finishing" touches!


Bedroom painting!


Our home office!


Curb appeal and a porch facelift!


And a backyard set for summer!

Sunday, January 29, 2012

A Practical Picturesque Pipe Pot Rack

Some of you may have noticed our pot rack in pictures from previous posts. So here is our post telling you all about it!


Being an older home, there is a large window in the middle of the kitchen. Meaning there is not a whole lot of cabinet space (luckily there is a decently big pantry for food storage). And pots just seem to take up so much room in cabinets. If we had put them in the few cabinets we have, there would be no room for much else. In an old apartment we had a pot rack (just one of those small oval ones) and loved the way displaying our pots looked. Especially now that we have more appealing stainless steel pots. So thus the idea of a pot rack was born.

Traditionally people put pot racks over islands. Well we don't have an island in our kitchen so that idea was out. There are also wall mounted ones, except we don't have any open walls in our kitchen to hang one. Scratch that idea too. I've also seen over the stove. Well we have our microwave there. That idea wont work. In our apartment we had it hanging over the bar area. Well we just knocked out that wall to open up the room and hanging something would close it off again and cut up the kitchen. Nope not a good idea. Then came the idea of hanging a rack from the ceiling in front of the window. The window is essentially wasted space in a kitchen where storage space is in high demand.

So now the trick was trying to find/figure out a pot rack that would work in front of the window. Most of the commercially made ones were too small and/or too wide. Since the window is so large (about 5 feet wide) a small pot rack would just look off in front of it. Not to mention it wouldn't be able to hold all of our pots and pans. We also didn't want a oval/rectangular one since it would stick out from the cabinets and just look awkward in our opinions. So I came up with this idea of hanging a curtain rod from the ceiling. It would be able to be hung out from the window so any swinging pots wouldn't break the glass, be able to extend then entire width of the window, and not stick out from the front edge of the cabinets.

This post is starting to get a little wordy, so I'll cut to the chase. Hanging a curtain rod from the ceiling is a lot harder than one would think. So to Home Depot we went to figure out a plan B (or C or D... not sure where we were at this point). We ended up in the section with all the conduit. And came up with the idea of half inch conduit (seemed to be large enough to hold the weight spanning 5 feet but not too large to look bulky). A couple of elbows and floor flanges would attach all the pipes together into a U and to the ceiling.


We bought some large S-hooks for the pots to hang from. This ended up being a bit more work than expected since the opening was too small to get the hooks onto the pipe. After a bit of prying, we got them all open enough and onto the pipe.


Last step was hanging the pots.


We think it looks great in the room. Give some purpose to the space of the window and a bit of sculptural art. It also adds a bit of industrial to the kitchen/house.

Monday, January 9, 2012

A New Look For The New Year

I apologize to everyone who has been waiting ever so patiently (and those of you that haven't been so patient by yelling at me for a new post) that I haven't posted in a while. The holidays, a few parties, and just trying to get the house put together took a bit of a toll on us. And unfortunately the blog posting didn't happen. But since we've gotten a lot done around the house, this post is going to be a "where is it now" post. A tour of the house so far. And some of the things you see that I haven't specifically posted about I will try to write a post about at a later date.

(Note: please forgive any dust in the pictures. There was drywall work going on and that dust just gets everywhere)

Kitchen


Eating area in the kitchen

Under construction: Downstairs half bath/laundry room

Entry way


Living room


Dining room (thanks for all the housewarming wine!)

Upstairs second bathroom


Back room upstairs (it's amazing what a bit of orange glow and a putty knife can do to fix a floor)

Master bedroom

Master bathroom

Our brand new garage roof and fascia (thanks to everyone who contributed to it!)

Tuesday, December 20, 2011

Now You See [Through] It, Now You Don't

Our front door has a large window in it (it takes up about half of the door). It is great for letting in light to the entry, but not the best for privacy. From the front porch you could see all the way through the hall and kitchen to the back of the house. So to solve the privacy problem, I frosted the window.

But just solid frosting is boring. So I wanted to bring a little clear glass into the design. We decided to go with an outline to sort of mimic the stain glass window next to the door. We also thought it would be nice to incorporate something such as "welcome" or the house number. Well, since the house number is on the front of the house twice already (under the stain glass window above the mailbox and also on the porch light), we went with "Welcome".

The process started by taping out the design we wanted to stay clear. I used blue painters tape for the outline and contact paper for the welcome part. Once the writing was on level, I had the tedious task of cutting out each letter.


After plastic-ing around the door, I used a spray paint froster (Krylon Frosted Glass Finish). It went on a little spotty after the first coat. But after a second and real light third it evened out.


And the finished product:


Edit: By request, here is the door from the outside!


Friday, December 9, 2011

Backsplash Bonanza

We finally have a backsplash! It was a decently long process, but well worth it. We decided to go with something a little different from the traditional tile and went with "tin" tile (it was actually a plastic, making it easier to work with).

The first step was to prime the tiles (two coats) so the paint would hold and not peel off when wiped down.


Then two coats of cream colored paint.


We then sanded them down to give them a bit of an old, distressed look.


Installing them was super easy. They cut with just a pair of scissors and went up in no time.


We love how it turned out! Unique and unexpected, but looks great! And it was definitely an easy DIY project for anyone, no matter how handy (or unhandy). So hopefully we can inspire others to think about a tin backsplash instead of typical tile... maybe?

Sunday, December 4, 2011

It's Beginning To Look A Lot Like Christmas

Over the last couple weeks, we picked up some more Christmas decorations. Some stockings, a wreath, some ribbon (to add to the wreath), greenery for the porch steps, and lights for outside.

The stockings we hung on our stair rail. We don't have a fireplace to hang them from the mantle, but we think they fit perfectly on the stairs. And yes we got three (cause the spoiled puppy has to have one too).


We bought four pots for the stairs to our porch months ago for flowers. Well its been a tad cold for flowers since we moved in, so they've been empty. And just looked a bit sad. So a trip to Joann later and we had some faux greenery (yes faux... its too cold for much else to last outside through the winter and this way we have for next year too). I ended up cutting all of the stems and redoing arrangements to make them look a bit fuller in the pots. And now the pots don't look so sad on the steps.


And our wreath. I had these grand plans of making my own with pipe insulation and burlap and ribbon. I even had everything in my cart shopping except the burlap when I found a pre-made wreath. It's not burlap but I thought it was amazing and had to have it instead. So back went the pipe insulation. But I kept the ribbon to add to the pre-made wreath to give it a bit more oomph. Using the clever trick of an upside down 3M hook on the inside of the door, the wreath hangs outside and looks amazing.


To top off the Christmas decor, Kevin also hung some lights in the front windows and around the porch area. With all the decorations and a little gift shopping this weekend, we're definitely feeling the holiday spirit!